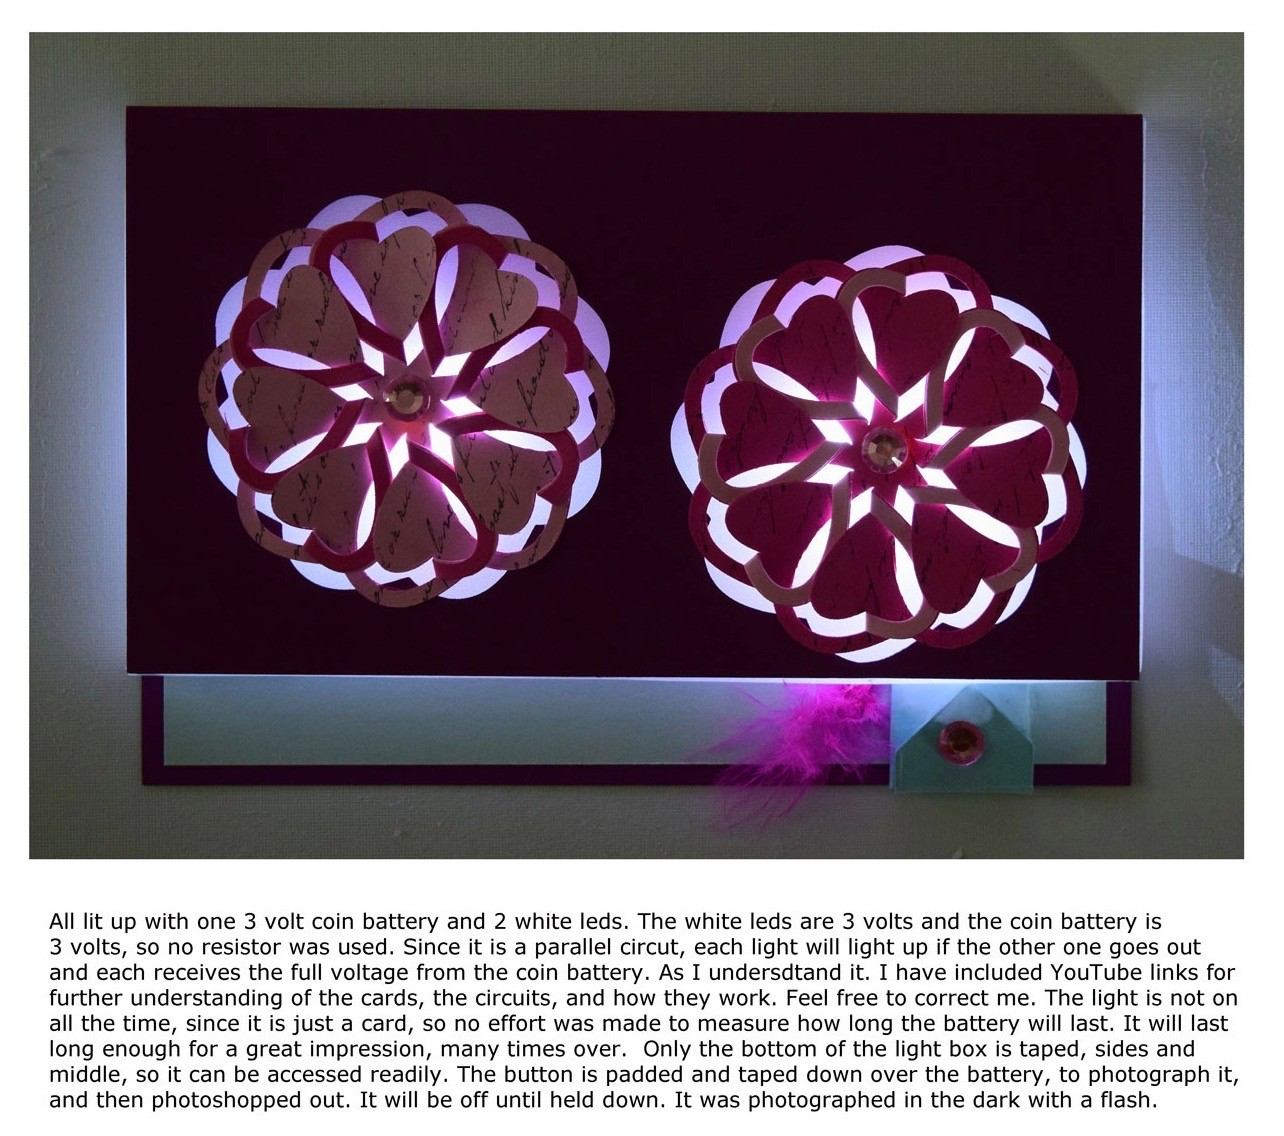
Send Love By Lighting Up Someone’s World-LED Light Cards
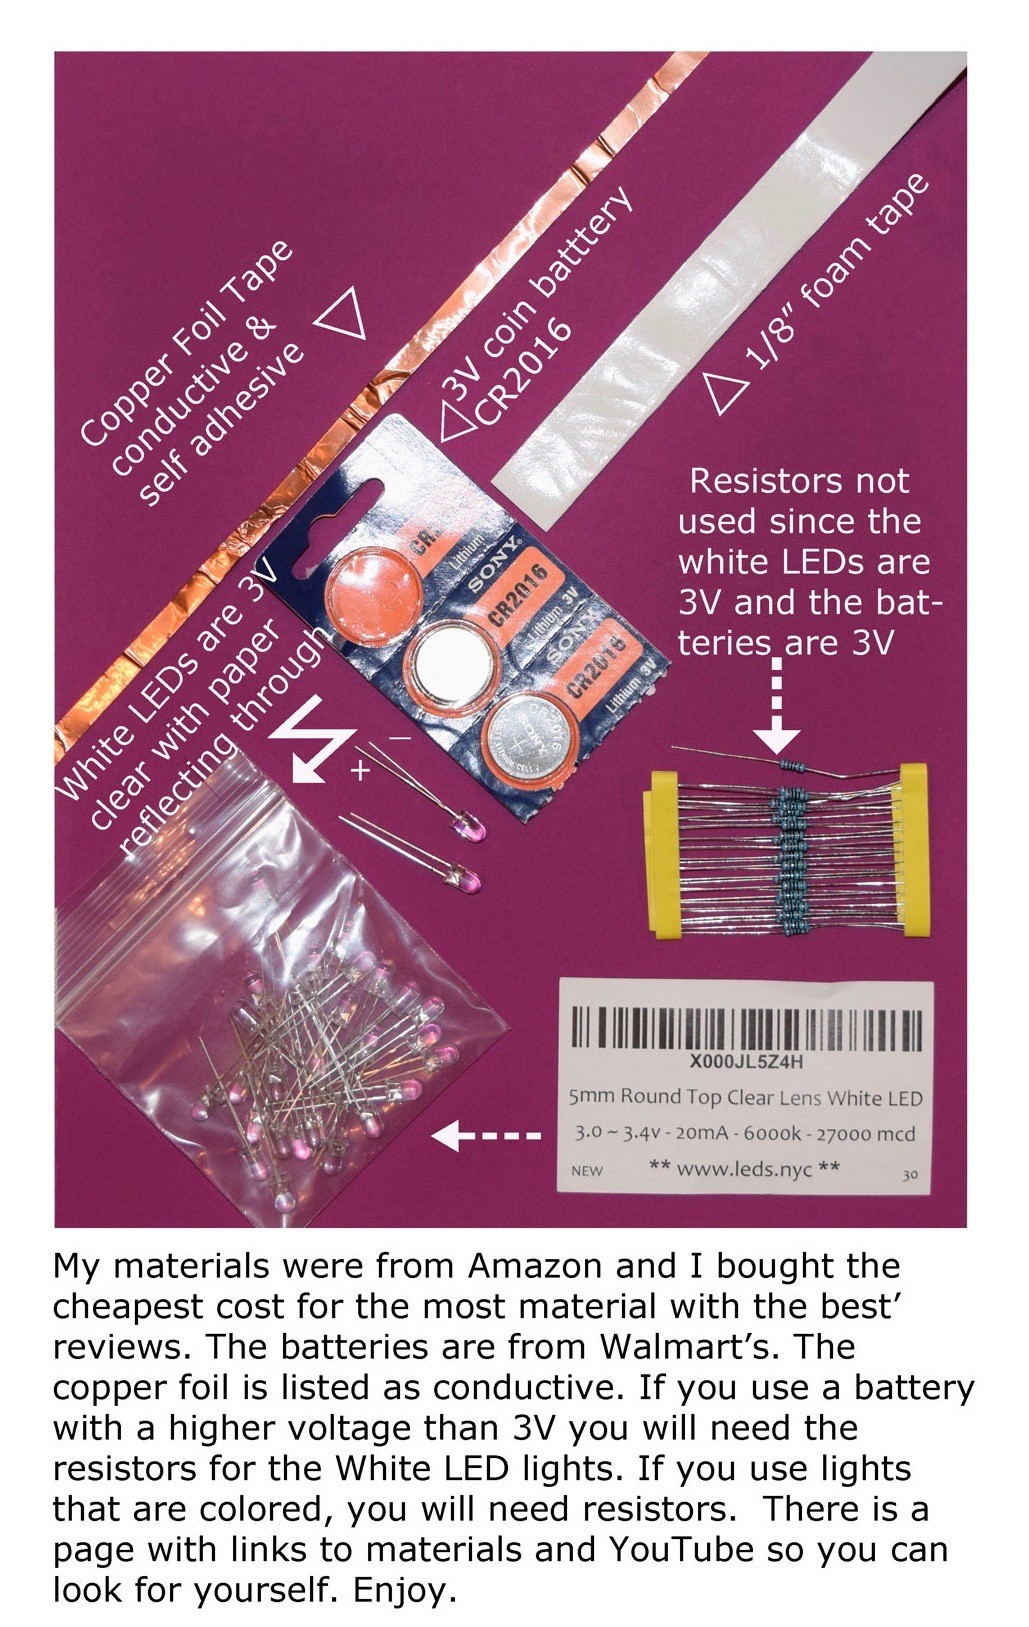
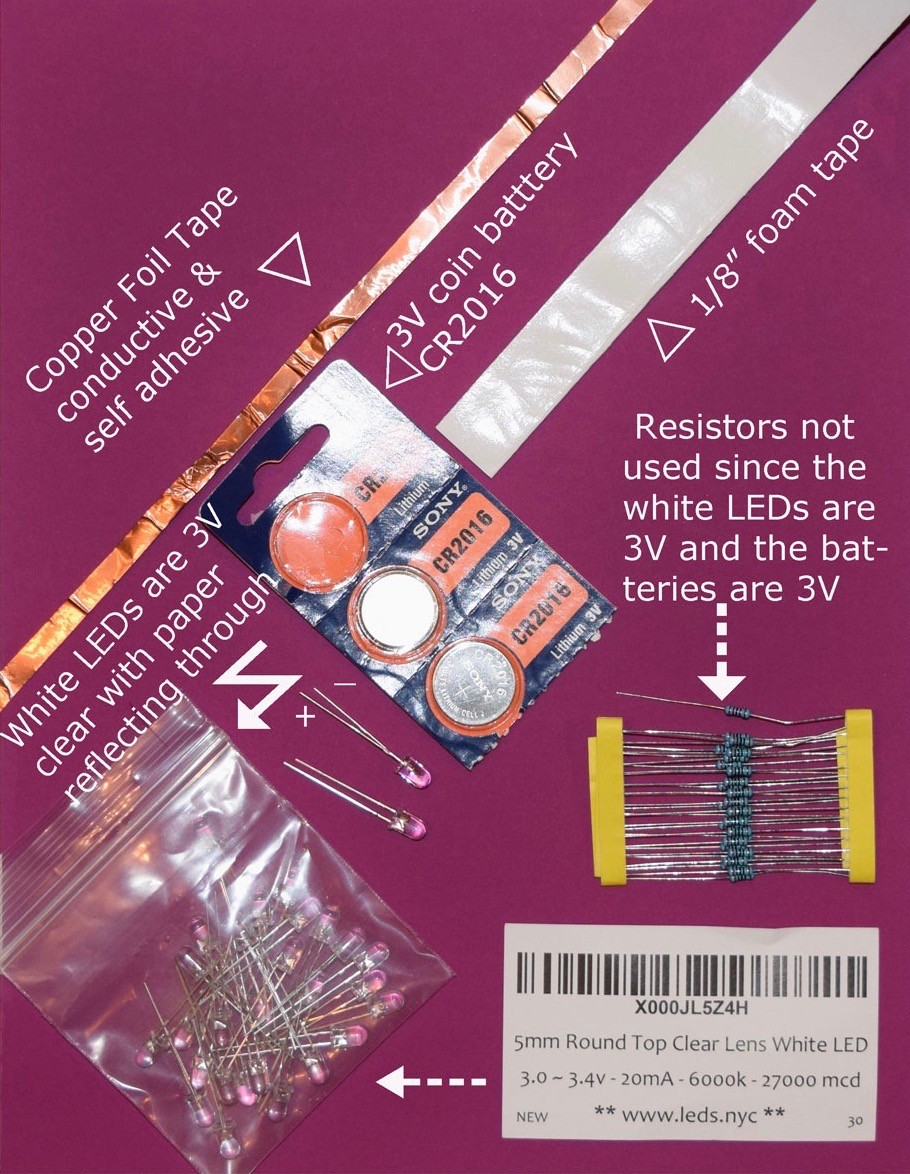
The fun never stops with a coin battery LED light card. This one is basic and simpler than it sounds. Keep referring to the photos, then watch some of the YouTube.com links at the bottom of the article and your card will light up quickly. They are short, fun and easy to follow. There is a list of where the materials were purchased; use what you have on hand. I bought the cheapest ones, with good reviews, and got lucky. There are kits, but they were costly; Chibitronics sells them and they make great videos. These are cheap WHITE LED lights, which stick up about 1/2″, so there is a 1/2″ vellum box for the housing. The biggest part, was deciding if resistors were needed; they came with the lights. My understanding is that since I was using WHITE LED lights which are rated at 3 volts, matched with a coin battery that was also 3 volts, my battery would not burn out my LED lights, by offering too much current for the lights. So I didn’t use the resistors.
Instructions for LED Light Card
The short version is that if you use colored LED lights they will burn out with the 3 volt battery, so you have to use a resistor to soak up the voltage, or the lights don’t get too much electricity and burn out. We are not doing that; use the WHITE LED lights and move on to the fun.
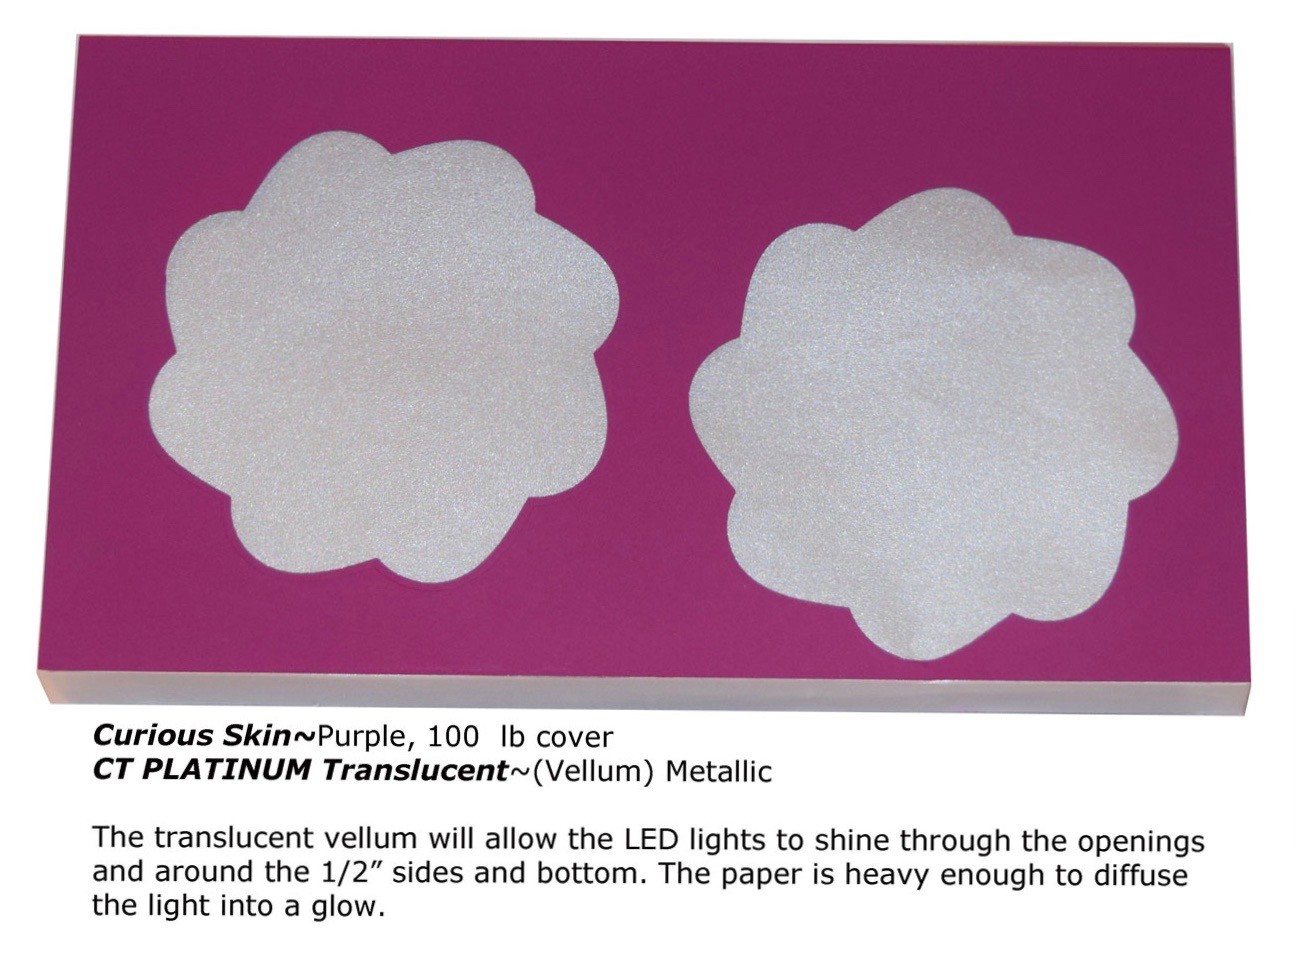
To make the card base, start with Curious Skin, Purple, scoring and folding the 8.5″ x 11″ paper at 5.75″ and 6.25″, creating a 1/2″ box. Refer to the photos. Before you move further, use your Geo-Die GD9 to cut out large scalloped holes in the short, Purple, front flap. Set aside the die cuts for another project. If you don’t own dies, you can print a similar design on the front flap before scoring/folding it and use an exacto knife to cut out the design.
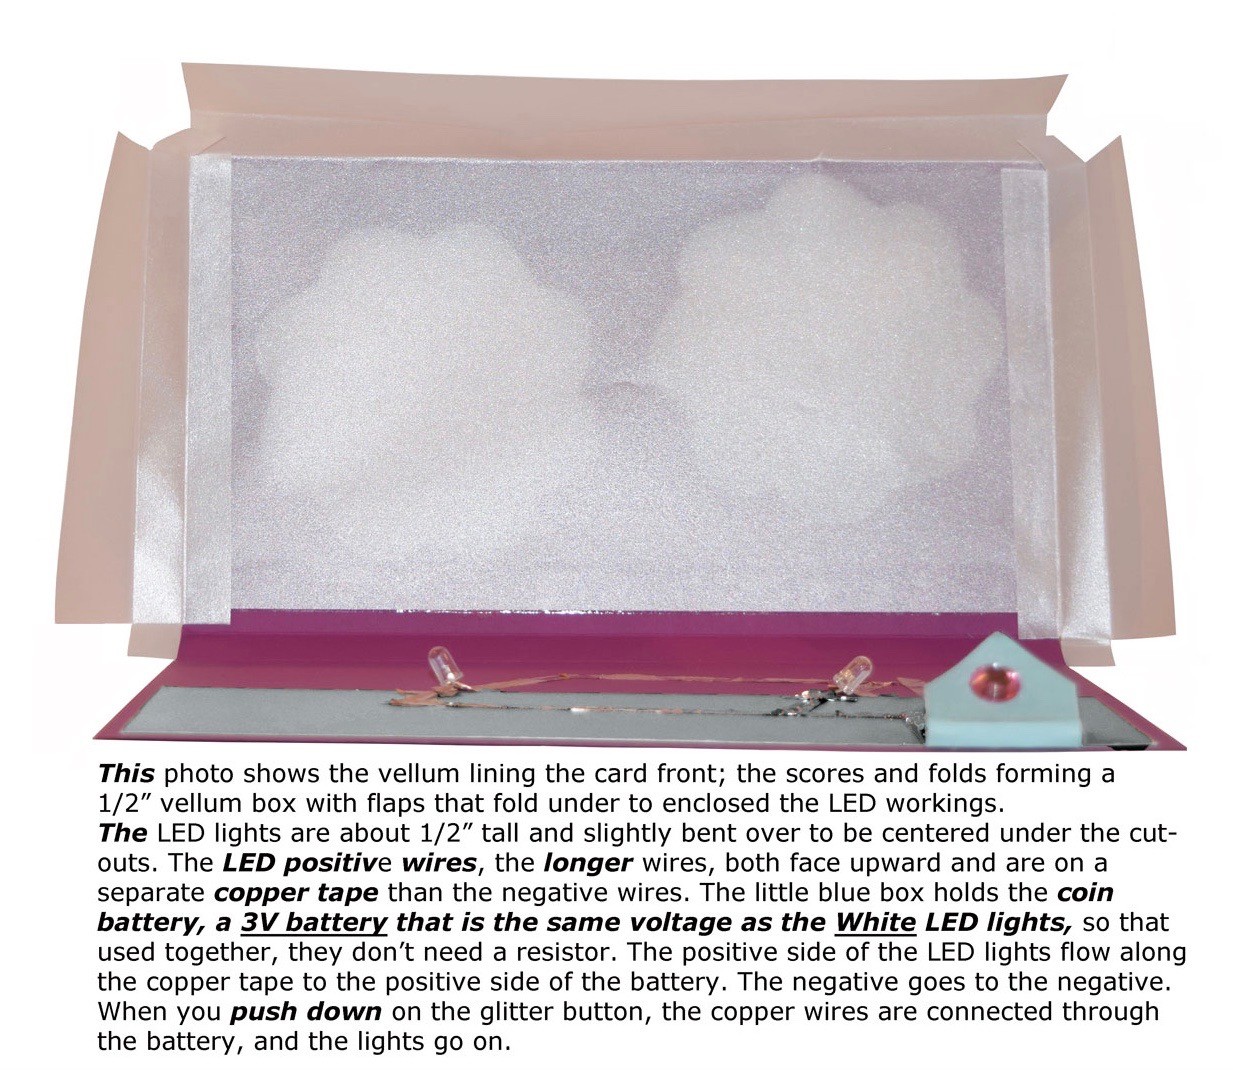
Using CT Platinum Translucent (Vellum) Metallic, cover the whole back of the front panel: cut the vellum 8.5″ x 6″ and score it at 4.5″ and 5″. This provides the bottom of the vellum box: using ScorTape secure the vellum to the back of the front flap. The vellum is mounted 1/4″ up from the card fold, so it does not add bulk. The 2 side flaps are separate pieces, each 4.75″ x 2.25″ scored at 1/2″ and 1″. This gives you 1/2″ to tape over the previously mounted vellum, a 1/2″ side piece for the light to shine through, and a flap to fold under. When all flaps are folded under you will have a little 1/2″ vellum light box with a Purple cover on the top.
The last step in the project is tucking under the flaps on all sides and securing it at the bottom by 3 small pieces of ScorTape to hold it down. You can tape it completely, but if you need to get into it, it will be harder. The front box does not cover the entire card front as you need an exposed card section to mount the coin battery. Use Stardream Metallic Aquamarine cut to 2.75″ x 8″ and mount it with an even border on the bottom and sides. Refer to the photos.
The LED lights are taped along the top of the Aquamarine, positive wire up (long wire) and negative down (short wire). Mark the Purple paper with a + mark to show what you have done. Try to center them behind the GEO die cut, bending the lights to one side a bit, if needed. Tape them down with a little conductive copper tape.
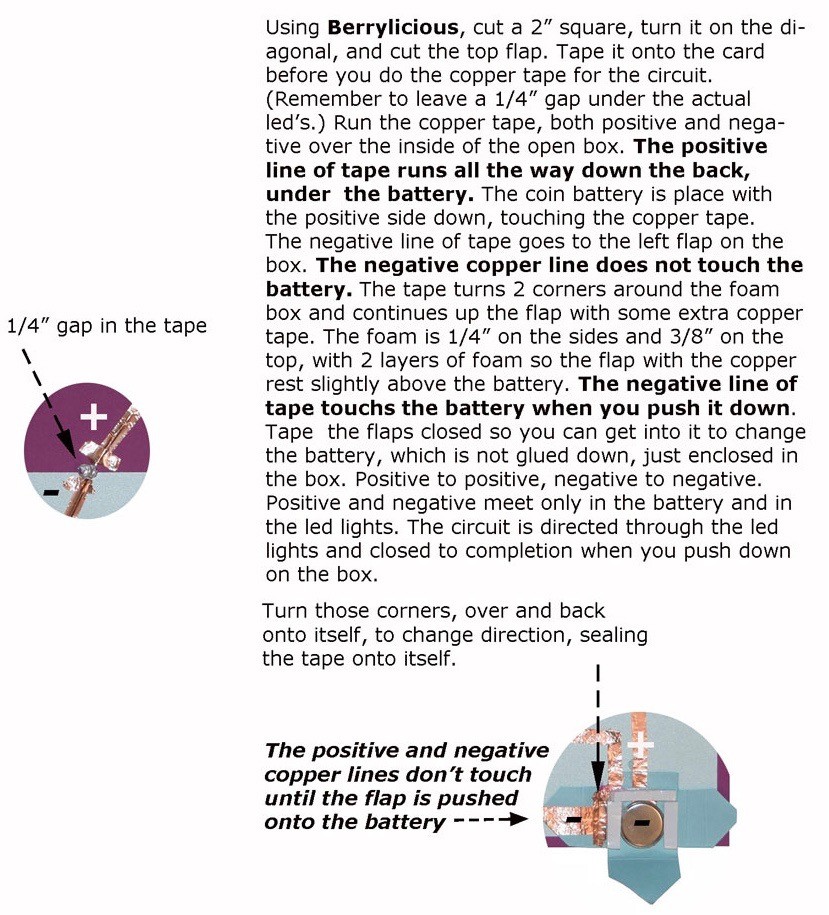
It is important to leave a gap in the tape behind the LEDs about 1/4″ so the negative side does not touch the positive side. The current then runs through the LEDs. Before you finish adding more copper lines make a battery box for the coin battery and tape it done. Both copper lines will run over the inside of the box, without touching. There is an entire photo devoted to this part.
The little battery box is Poptone, Berrylicious it is a 2 inch square, scored at the centered diagonals, with the top fold cut off so it fits under the vellum box. It is scored again so it is about 1/8 inch deep. The negative tape runs in a continuous line over the left fold, over the little Berrylicious box, down the inside, not touching the positive tape, with extra tape for more connection, and only touches the positive when the left flap is folded over and pushed down onto the battery. Use foam tape that is 1/8 inch thick to build a wall around the battery on 3 sides that is a little taller than the battery; 2 layers of foam. The battery is not glued in: the positive of the battery goes to the positive LED copper tape.

Referring to the photo, the box folds up 3 sides, and when taped together, holds the battery. If you don’t glue everything, you can change the battery. Undo will undo the tape. Continue the copper tape lines from the LED to the battery. For this you will remove the battery, since the positive copper tape runs under the battery: use plenty of tape, especially up near the LEDS. If you have to, go back and cover that area with lots of clear tape, over the copper tape, and up to the LEDs. Carefully use a bone folder to seal down that tape and LEDs to get a good connection. Put on more copper tape if you tear something (under the clear tape).
If you test it and it doesn’t light up, check that your battery is put in correctly. + to +. That is by happenstance a parallel circuit, so the lights should be at max brightness. Positive to positive, negative to negative. Positive and negative meet only in the battery and in the LED lights. The circuit is directed through the LED lights and closed to completion when you push down on the box.
Lear More about : What are Printable Electronics? Applications & Challenges
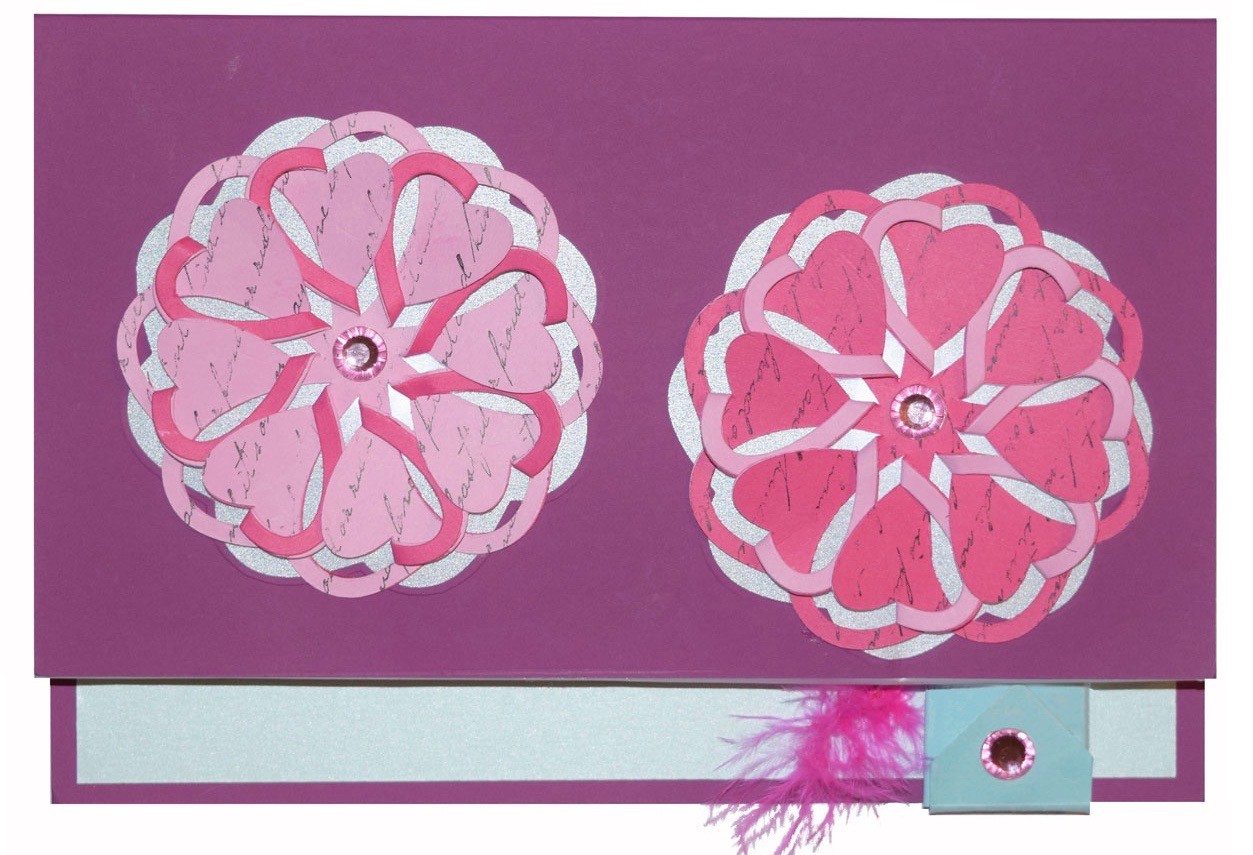
Tape the vellum box closed and glue/tape the GEO-Die designs over the cut out spaces, on the vellum, adding a little fluff of boa next to the battery box. Using Pop-Tones Cotton Candy and Razzleberry, stamp the pinks with StazOn ink using a writing script stamp and cut two of each color.
Conversely, you can print the design on the with either ink jet or laser. Spray glue them back to back in reversed colors and fold over the 3D cut outs. There is enough space between the designs that the light will make a wonderful design shining through, especially if you offset the scallops when you glue it on.

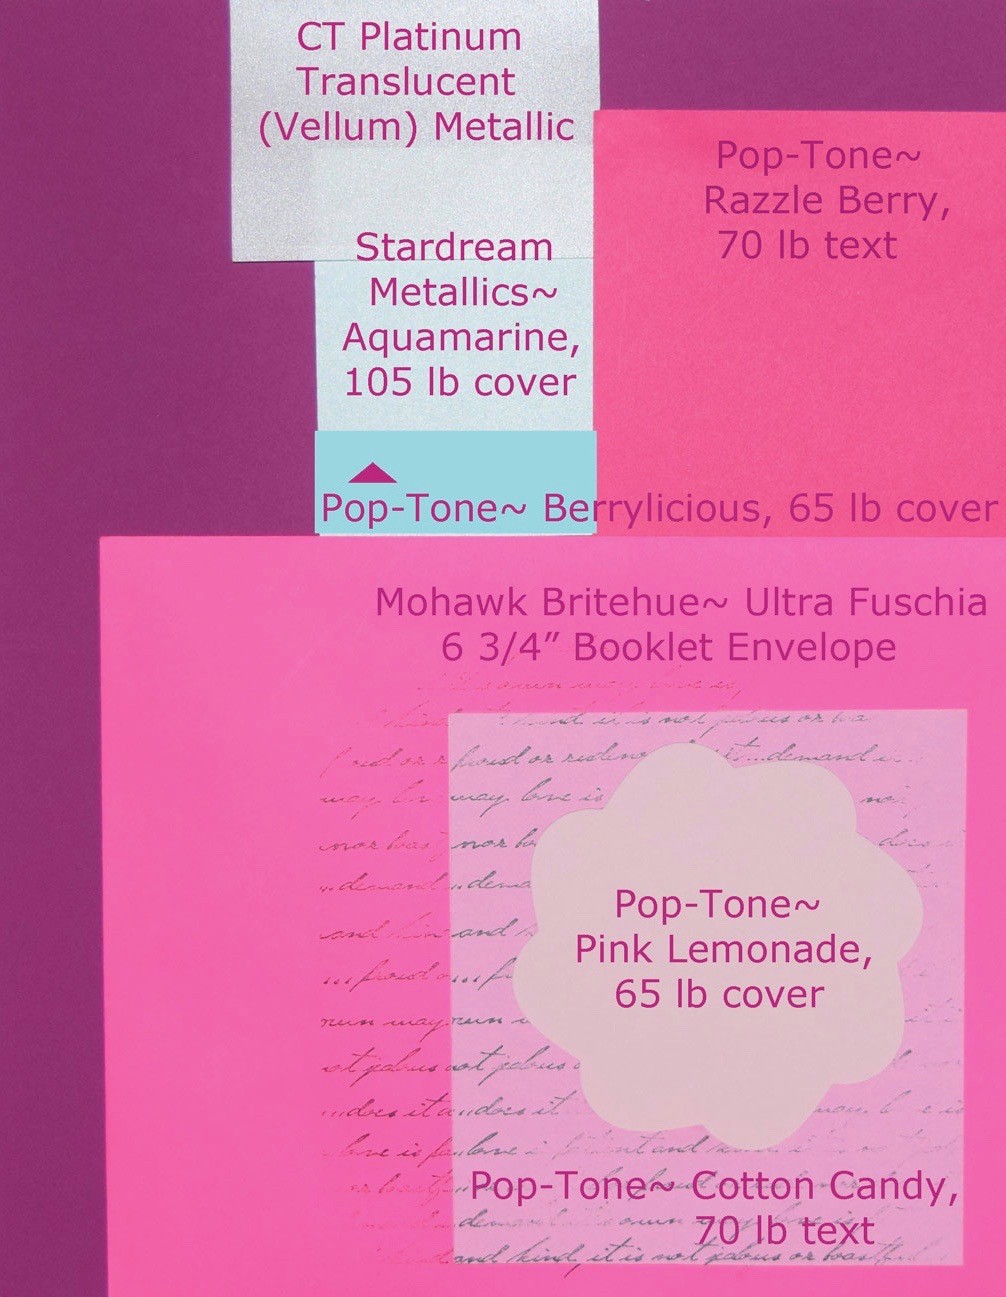
Using Poptone gives you a tonal range that is soft yet interesting. Fully printable, the colors are named after your favorite sweet treat. Curious makes an interesting collection of papers, this one being the matte. The Curious Skin is a wonderful paper that has a vibrancy rare among papers, with color on both sides. It die cuts, folds, and scores with great ease. It is sensuous to the touch with a fingerprint resistant surface. The accent color Aquamarine has a preference for laser printing, but I would not hesitate to test the ink jet on it, and maybe sealing it with acrylic. The LED card is pretty basic and almost makes itself. Enjoy!
Materials for LED Light Card
- Curious Skin (If Curious Skin is not available please check out the “Shop Color” tab.)
- Purple, 100 lb cover
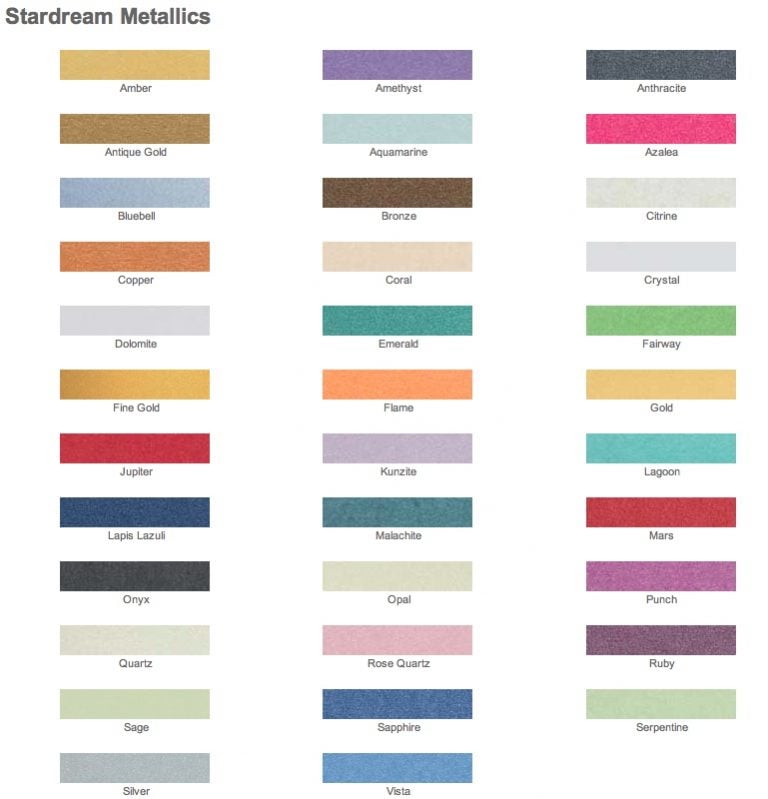
- Stardream Metallics
- Aquamarine, 105 lb cover
- CT PLATINUM Translucent (Vellum) Metallic 8.5 x 11 Paper
- Poptone Paper
- Cotton Candy, 70 lb text
- Razzle Berry, 70 lb text
- Berrylicious, 65 lb cover
- Mohawk (If Mohawk is not available please check out the “Shop Color” tab.)
- Britehue, Ultra Fuschia, 6 3/4 Booklet Envelope
While finding more about this project feel free to look at these links to help make this project easier:
- Making a light up card with LEDs by Rosie Research
- Getting started with copper tape for paper electronics by Jie Qi
- Using Copper Tape with Paper Circuits by Core Electronics
- Circuit Stickers tutorial by Jie Qi
- Interactive Light-Up Card by Inklipse
- Card Making and Paper Crafting How To: ChibiTronic LED Lights by Simon Says Stamp
Lighting Materials – use what you have, this is what I bought on Amazon:
- Copper Foil: LGEGE (2 rolls) Dual Conductive Adhesive 55yd Electron Copper Foil Tape Self-adhesive copper foil tape Stained Glass, Slug Repellent, EMI Shielding, Paper Circuits, Electrical Repairs
- LED Lights: I got the 3V coin batteries at Walmart
- microtivity IL151 5mm Clear White LED w/ Resistors (Pack of 30)